Install WireGuard on OpenWrt
1. Choose how you want to connect to OVPN
2. Install WireGuard on your router
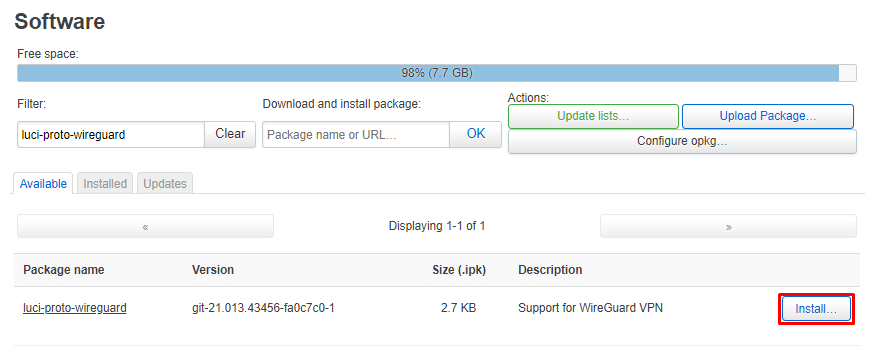
Navigate to System → Software and click on Update lists.
Search for luci-proto-wireguard and install it. 
Once installed, reboot the router by clicking on System → Reboot and click on Perform reboot.
Use OVPN if security is of importance
Your privacy and security is the core focus of OVPN. That's why we've implemented a multi-layered security model.
Learn more3. Configure OVPN
Navigate to your router's web interface again and log in. Once logged in, navigate to Network → Interfaces. Create a new Interface called wg0. 
3.1 Configuration category: General settings
Navigate to General settings and enter the following information:
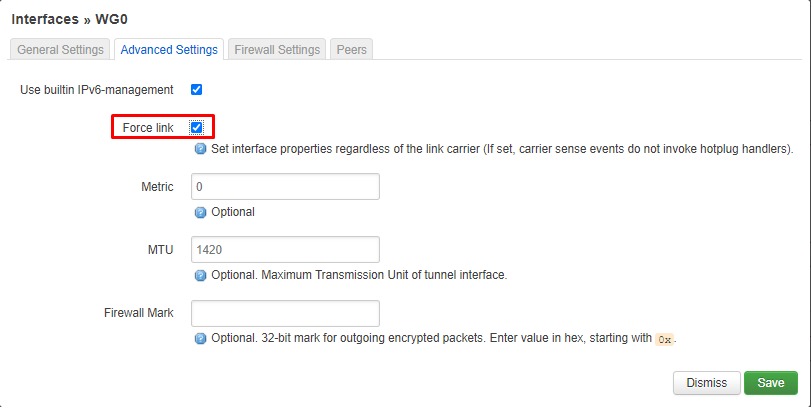
3.2 Configuration category: Advanced settings
Navigate to Advanced Settings. Make sure Force link is selected.

3.3 Configuration category: Firewall settings
Navigate to Firewall Settings and click on Create/Assign firewall-zone. Enter OVPN as the name and click Enter.

3.4 Configuration category: Peers
Navigate to Peers and click on Add peer.

Enter the following information:
Click on Save.
Click on Save & Apply.
At this point you may lose internet connectivity. Internet connectivity will be restored at the end of the guide once all steps have been followed.
4. Configure the firewall
Navigate to Network → Firewall. Find the firewall rule called OVPN in the list and click Edit. Enter the following information:
Click on Save.
Find the rule called lan and click on Edit. Under Allow forward to destination zones, make sure OVPN is selected and that WAN is deselected. This will avoid any potential leaks.

5. Prevent DNS leaks
Navigate to Network → Interface. Click on Edit next to lan.
Under General Settings, find Use custom DNS servers and enter 46.227.67.134 and 192.165.9.158.
Click on Save.
Click on Save & Apply.
6. Connect to OVPN
WireGuard will automatically connect whenever the router is booted. In order to apply all the changes and restore internet connectivity, the router will first need to be rebooted.
To reboot your router, navigate to System → Reboot and click on Perform reboot.
7. Verify that the connection was successful
You should now be connected to OVPN and be able to browse the internet safely. To make sure everything was set up correctly, please check the dashboard to verify that you are connected.
- 1. Choose how you want to connect to OVPN
- 2. Install WireGuard on your router
- 3. Configure OVPN
- 3.1 Configuration category: General settings
- 3.2 Configuration category: Advanced settings
- 3.3 Configuration category: Firewall settings
- 3.4 Configuration category: Peers
- 4. Configure the firewall
- 5. Prevent DNS leaks
- 6. Connect to OVPN
- 7. Verify that the connection was successful
Best deal of the year - get 71% off our 1-year plan for Black Friday! Get Deal
View pricing
